Pumpkin Carving
I have been carving pumpkins for a long time - in fact my entire life. And in the last fifteen years I have developed an interest in carving more complicated patterns, as can be seen in my pumpkin galleries from years past (2001-2005,2006-2011,2012 - 2014 ).
In the past I have always used traditional methods of transferring a pattern and using small saws to carve them. However this year (2014) I decided to experiment with some different techniques to see which worked better and which worked worse than the usual methods. And since some others may have the same questions as I did regarding these alternate methods, I decided to post some simple reviews here.
NOTE: Although these methods are all relatively safe, the still require sharp knives and powertools, and often involve moving powersaws and rotary tools close to your face and fingers. Please be cautious. And as usual, the information given below is just for information purposes and I make no claim to the safety or accuracy of anything. Use these methods at your own risk, as I assume no liability for anything.
Pattern Transfer
One of the most tedious and labour intensive steps in pumpkin carving is transferring the pattern from the printed sheet onto the surface of the pumpkin. The standard method is to use a pin to poke holes through the pattern and into the pumpkin itself. Then the pattern is removed and the dots get connected into a pattern on the pumpkin surface. I have used this method a couple of times, but it is so boring and time consuming that I stopped using it early on.
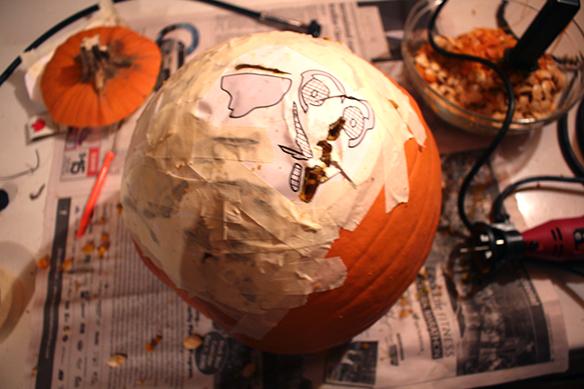
Paper Cutting: The method that I have used for many years is to simply cut through the pattern. I tape it to the pumpkin with masking tape, and then use a power saw to cut but paper and pumpkin together. As I cut more away, I add masking tape to hold the pattern together. This is faster than the traditional methods, but it has the downside of the paper shifting and warping the design, as well as pieces of paper tangling the saw blade. I also found that it doesn't work well for etched designs, where there is more cutting and no hole for it to fall through, as the paper seems to dissolve in the pumpkin mush that is generated.
Transparency Transfer: This was a method that was suggested by someone in a pumpkin carving forum, but it doesn't work at all for me. The claim was that you could print a pattern onto thick clear plastic sheets, and then press it down on a moistened pumpkin to transfer the image. The claim was that the ink would transfer and dry onto the pumpkin surface. However I found that the ink never dries properly but simply smears over the surface. I couldn't get any pattern transfer using this method, although it is possible that the original poster used a different type of ink or plastic sheeting. This was a complete failure in my opinion.
Wax Transfer: Another common method that I have heard about is a wax transfer. Art supply stores sell sheets of waxed paper that are placed between the pumpkin and the pattern. By tracing the pattern, blue wax lines are deposited on the pumpkin surface. This is much easier than the pin-prick method, and supposedly has been used successfully by many carvers. Unfortunately my local art supply shop doesn't carry it, so I couldn't test this method.
Stick N Carve: This was a product I was eager to try this year, because it was recommended by ZombiePumpkins who produce some of the most interesting designs on the internet. The user prints the pattern onto a special sheet of Stick N Carve, and then sticks it to the pumpkin surface like a big sticker. The pumpkin is then carved through the SNC sheet, and when completed the SNC can be peeled off or washed away (it is water soluble). Because it was recommended by ZombiePumpkins, I am certain that it can be used successfully. However in my own experiments with it, the glue wasn't strong enough and the pattern shifted during the carving process. My local supplier charges $2.50 per sheet, and to be honest I found it didn't work as well as the two cent sheets of printing paper that I used before, except for doing etching. However if the glue was strengthened, this could be an excellent product.
Cutting & Carving
The next step after the pattern transfer is to carve out the design. I have always used either a hand saw or a specialized pumpkin carving power saw, but this year I also wanted to try a rotary tool.
Hand Saw: Over the years I have tried many makes and models of hand saw for pumpkin carving, and they all work reasonably well. But they are slow and it is tiring when doing more complicated patterns. But it works for doing one or two simple patterns.
Power Saw: These are battery powered units that usually cost around $15, and are essentially a hand saw with a reciprocating motor. This is my standard method of carving, and I have a PumpkinMaster saw that has been going strong for over a decade now. My saw also has a replaceable blade, although the replacements are getting harder to find. But I really like the speed of this unit, and I do recommend these for anyone who is serious about pumpkin carving.
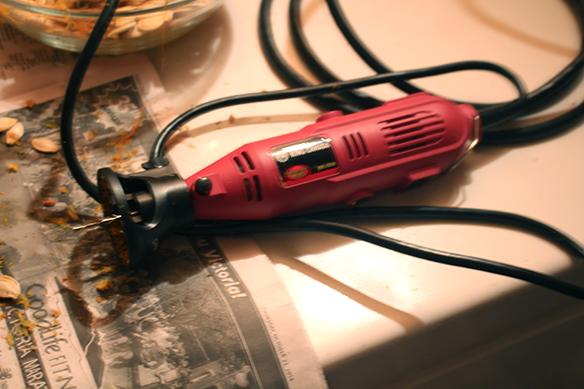
Rotary Tool: This year I decided to experiment with a rotary tool (sometimes called a Dremel tool) and a tile cutting attachment. I added the tile cutting attachment because it keeps the depth of the cut constant without the rotating chuck hitting the pumpkin. I like being able to dial in a depth and etch the pumpkin as well without cutting all the way through. For the bit I used a multipurpose cutting bit that is intended for vinyl, wood, and laminates. I liked that the rotary tool was faster and provided a cleaner cut than the pumpkin saws, but the downside was that the pumpkin flesh kept pulling the bit out of the chuck. In fact this was so common that I wonder if it might be a safety issue, as a few times I had to quickly turn off the rotary tool when the bit started wobbling quite badly. At the end of the day though, with proper safety gear, I do feel that the rotary tool and tile cutting attachment did provide the best carving of the three methods.
Conclusions
So in the end, I think the best method I found was still to use the sheet of paper taped to the pumpkin, and to carve through the paper. For carving, a power saw worked really well for basic and intermediate designs, but for anything requiring etching the rotary tool was far superior, especially with the depth guide attached to it. But that is just my opinion...